Showing posts with label Sewing. Show all posts

Saturday, July 16, 2011

Sun dress

A while back I made a summery dress with this patternSimplicity Sewing Pattern 5189 Misses Dresses, KK (8-10-12-14).  Well for my birthday, my mom sent me a gift card to JoAnn fabric (thanks mom!), I went there and the fabric I liked was on sale!  So I got enough fabric for two dresses and have made one already!
My five year old daughter also made me a necklace out of clear beads and insisted that I wear it while taking the picture.
I make a few changes to the pattern.  I shortened the sleeves, didn't put any facing on the inside collar, and when it came to hemming, I just did a ziz zag stitch all along to raw edge, and then folded it up and did a straight stitch to hold it up.  It was SOOOOOO much easier than folding it over twice and trying to get it to stay and not going crazy!  I also made the tie a lot wider and made a smaller hem on it so I didn't go crazy turning it right side out!  And I made the tie one long part and didn't attach it to the dress so I can switch it up with other belts later on if I want to.  I'm pleased with the way it came out!

Friday, June 3, 2011

Summer-y Dress

I only have a small amount of dresses, plus a few skirts and nicer shirts, enough to change things up for church every now and then.  But the thing is, just about everything is made of a thick and or/synthetic fabric, and mostly with long sleeves.  We're in Texas, where we've been getting temperatures in the nineties on and off since early April, and lately we've been getting close to or above 100!  Can you see how well insulated clothes are extremely impractical?  So a more summer-y dress would be appropriate, don't you think?  Unfortunately, I don't have much money in my budget for a dress, and even the options available for a reasonable price show WAY more than I want to show!  Enter creativity!
Several years ago, I purchased this Simplicity pattern from Walmart, I've seen it recently too, which makes sense because it's a fairly easy project!
Simplicity Sewing Pattern 5189 Misses Dresses, UU (16-18-20-22)
I made the longer one with the long sleeves with he flounce when I first got it, and although it turned out all right, I was newly pregnant with my second child, who would end up coming out over 10 pounds!  So you can imagine how that dress didn't fit me for long.  Then we moved and had to get down to bare bones everything, so the homemade dress didn't make the cut.

Fast forward to this "spring," though it's felt like summer for months now!  I really wanted to make a more summery dress and this pattern goes nicely with my very limited sewing skills.  Then I looked through my bag of tricks and found a bed sheet that we had gotten at Walmart for $3 a while back, and had intended to make curtains out of it, but we moved and our window needs changed.  I really liked the color, so I spent a day and a half (with many interruptions) making this:


This is before I thoroughly ironed it, but it was so breezy and kept me so cool, did I mention on the day I wore it to church, and then all day and outside for a long walk it got up to about 103 degrees!  And I wasn't nearly as sweaty and miserable as I would have been otherwise!
You know the most tedious part about this dress?  The tie straps!  They tie in the back since it's a pullover dress (no buttons or zippers!  Yay! But I think I sewed the fabric for the straps with a little too much of a seam allowance, so they were a PAIN to turn inside out!  You could also omit the straps entirely and just wear a nice looking belt, or have a little more leeway in the form of your dress. 

I plan to use this pattern again to make a more casual dress with a floral print and regular short sleeves.  I may have to wait a while since I don't have and florals in my scraps, so I just have to fine some floral sheets or some  $1/yard fabric.
I'm really happy that I saved that pattern!

Monday, April 11, 2011

Plastic Bag Holder

What do you do with all the plastic grocery bags you get from the store?  Do you just throw them out?  Do you use cloth bags (if so, power to you!), or do you put them in one place to use later?  We use ours to wrap poopy diapers and as liners for the small bathroom garbages.  But how to keep them organized so it doesn't overwhelm you and make you want to scream when you try to get a bag?  A bag holder!  Hold on, we're watching our money and every penny counts, that's money we could use to buy diapers for the kids to poop in and require the need of the organized bags!  That's where it's handy to be resourceful and a little creative!  This is my bag holder!  (My apron is behind it if you're wondering) It probably took me an hour to make (that's an hour of actually working on it, start to finish was much longer since I kept having to do other things like make dinner, feed the baby, and so on).  It was really simple. 
I used some scrap fabric from non-flattering and worn out clothes, and some yarn I had sitting around that needed a job.  the fabric I wanted to use was only usable in small strips so I sewed the strips together to make a big rectangle, about  20 inches wide and 24 inches long.  You can change this to your own needs, but this worked for us! 
I folded the two shorter sides over about 3/4 of an inch and sewed them as close to to non folded edge as I could, this made two long, tube-like pockets. 
Then I folded the fabric longways, so the tubed pockets were on the top and bottom with right sides together. 
Starting AFTER the first pocket, I sewed a straight seam that ended BEFORE the other pocket, you don't want to sew your pockets closed!
Then I took my yarn and made two crocheted chains about 9 inches long.  Pieces of yarn or elastic that long work fine too, I just did yarn because I had no elastic, and the chain gave me a little elasticity.
TIP:  If you have a worn out fitted sheet that you're wanting to use for something else, the elastic from that would be great in this project!
To get the elastic or yarn to go into the tube like pockets, put a safety pin through the end and then you can wriggle it through by feeling it.  This works much better that tying to jam or hook it through with a crochet hook (I speak from experience).
Tie the yarn or sew the ends of elastic together.
Next, I tied some more yarn to the top yarn to make a loop I could hang it from.
Easy cheasy lemon squeazy!  Stuff bags in the top, pull them out from the bottom!

Monday, April 4, 2011

Hot pads

For quite a while we have not had real hot pads (or pot holders or whatever you call them).  In our last place we had two hot pads that I had crocheted several years ago, but because they were crocheted, double crocheted I might add, there were big gaps in them, so you had to fold them over and still possibly burn your finger.  They were so worn that when we moved here three months ago, we just threw them out.  For a while we would just use washclothes or hand towels, but those were awkward and inconvenient to store.  So I finally made some more (and much better) hot pads.  I did most of this before I started this blog so I don't have step by step pictures.  But I will tell you how I did it.
First, I crocheted the basic shape out of scrap yarn, I had around the house and had never used.  I single crocheted it with  either an E or F hook.  I think it was about 22 across for the grabber ones, and about 27 across for the trivet ones, I just kind of eye-balled it and the made another to match.  I did enough rows to make the big ones square, and enough to cover my hand on the small ones (probably about 24 or or so).
Second, I took some scrap fabric that I never liked the look of and put two layers of that (cut to about size) on each one.  To hold that in place, I just took some  thread that I don't really like the color of anyway and tired in a lot like you would tie a quilt, just to hold it in place.
Eventually I got to the next step which was to pit on the fabric that I liked.  This fabric used to part of a skirt that I got for free but the cut was REALLY unflattering on me, plus I like to not have too many patterns on my bottom half since I'm a little more pear shaped and I like more neutrals on the bottom so people's eyes aren't drawn to the overly curvy areas.  Moving on...I cut the fabric I wanted just a little bigger than the currant hot pad size for seam allowance, and had several small strips of fabric for the loops to hang them up.  On the loops I just folded them over with right sides together and sewed one line near the open edge.  I used a crochet hook to turn them right side out.  For the hot pads themselves, I sewed the fabric for the outside on three sides with right sides together, then turned them right side out, put the innards of the hot pads in, folded the frayed edges in, tucked the loops I'd sewn in the corner, and sewed really close to the edge to seal up tat side. 
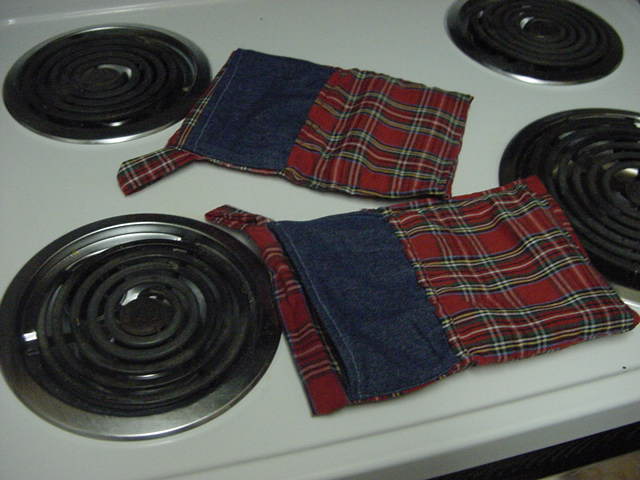
For the grabber hot pads, I just tucked an extra piece of fabric in there when I was sewing up the sides (I had to be careful to make sure the right side would be facing out) so it made a little pocket for my hand to fit into.  It was very simple, and made with things I had around the house and wasn't using, so virtually free!  Then I noticed something. 
The little pocket for my hand was too small!  It would easily slide off my hand, and barely held my thumb in.  I was considering just dealing with it, but my husband cast his vote too (he does cook sometimes) that it needed to be longer because his thumb would stay in and he wanted it to feel more secure around his hand. 
It took me forever to get around to finally fixing it, during which time I also noticed that when I needed to take something out of the oven  or off the burner quickly, it took a bit of time to figure out which side of the hot pad had that stupid pocket in it!
So, I took some more scrap fabric, in a different color, and cut it to just a bit bigger than I needed.
Then I tucked under and sewed a hem on the bottom, and folded the edges in and tucked in into the pocket.  I just sewed the sides with my sewing machine, then I sewed the top of the fabric to to underside if the existing pocket by hand.  I did this because using a sewing machine would have sewed the top part of the pocket shut and that would kind of defeat the whole point!
So here they are!  All done, and easy to tell which side had the pocket!
And look!  My thumb is all contained and everything!